Testing personalization campaigns
Personalizations in RightMessage are cumulative. This means that if you have multiple campaigns (i.e. one targeting industries, another targeting job roles, and a third targeting customer status), the changes these respective campaigns make will “stack” and create a one-off page for each visitor.
In this guide, we’re going to show you how to best test the campaigns you’re creating.
Create “internal” auto-segment rules for testing
Segments can get applied in a lot of different ways: 1st/3rd party data, on-site behavior, or answers to questions.
Simulating putting people into segments – especially for tricky ones like they landed on /this-page from google.com – can be time consuming and brittle.
However, a specific auto-segment rule can make doing this really easy. Here’s how.
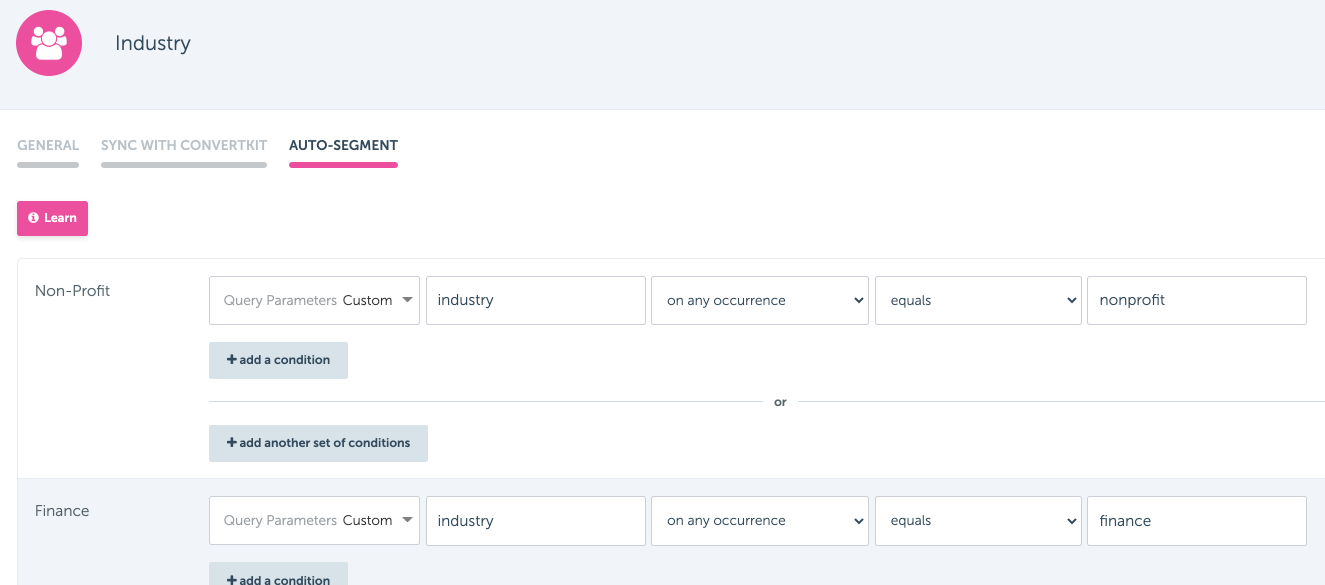
On the “Auto-Segment” tab for the Segment Group a particular campaign targets, add a new rule.
Choose “Query Parameters → Custom” and then enter something like “industry”, “on current page”, “equals”, and then a short name for the segment you’re currently modifying.

For example, say you have a “Non-Profit” segment within an “Industry” Segment Group. You’d create a rule that matches industry=nonprofit.
Do this for each segment you’re planning on testing.
Simulate in the browser
Testing is easy once you have these auto-segment rules in place.
Once each of the Segment Groups you’re personalizing for have “internal” auto-segment rules in place, publish your changes and then head over to your web browser of choice.
Let’s say you want to test the following segment combination on your home page:
- Business is a non-profit
- Company size is 10-50 employees
- Using Xero for invoicing software
Based on the internal auto-segment rules you set up, accessing something like https://yoursite.com/?industry=nonprofit&size=10-50&tool=xero would have RightMessage place you in these three segments. And because your auto-segment rules are specified to be just for the current page, swapping out “nonprofit” with “retail” would then show a retail-focused variant of your home page.
Here’s why this is so powerful…
Imagine you have 10 industries you’re personalizing for, 5 job roles, and 8 different invoicing software options. That gives you 400 different versions of your homepage. And testing combinations is as easy as just changing URL query parameters (obviously your visitors will be segmented based on their behavior or survey questions, but this gives you an easy way to either quickly test or show off the magic of personalization to a stakeholder.)
RightMessage campaigns execute from top-to-bottom. This means that if the first campaign you’ve created changes the text of your homepage’s headline text and the second campaign you’ve created targets the exact same element, the second campaigns text changes will override the first’s.
Keep this in mind. It can be annoyingly frustrating to try to figure out why something isn’t personalizing the way you expect it to, only to discover it’s because something else ended up “claiming” that element.
For instances where multiple campaigns need to target a headline – A headline that reads “Perfect for JOB_ROLE in INDUSTRY”, for example – the way to do this is to create sub-elements (in this case, <span> tags) that each get personalized.
Your actual headline’s HTML would probably look like this: <h1>Perfect for <span>your role</span> in <span>any industry</span></h1>
And the campaign that targets your “Job Role” Segment Group would personalize the first <span>, and the “Industry” Segment Group would target the second.
Manually selecting an element to personalize
You may come across an issue where you are unable to select an element in the campaign editing area using the built-in highlight feature.
- About Us
- Contact Sales
- Contact Customer Support
- © RightMessage Inc. 2024
- Privacy Policy
- Terms of Service
