Adding RightMessage to your WordPress website
Setting up RightMessage with WordPress is as simple as installing our WordPress plugin.
This guide walks you through:
- Installing the RightMessage plugin
- Adding our script to your website
- A few unique segmentation goodies that come with the plugin
- Setting a default, end-of-post CTA
Installing the plugin
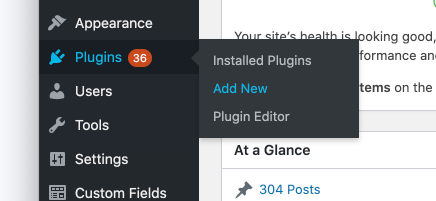
From your WordPress dashboard, select Plugins → Add New.

Search for “RightMessage” in the plugin directory and activate. If you’d prefer to download the plugin’s zip file manually, here’s the link.

Once activated, head over to Settings → RightMessage.

Adding your custom tracking script to your website
To add your unique tracking script to your website, simply enter your Account ID and click save.

To find your Account ID, open your RightMessage dashboard in a new tab. You’ll find the ID in the URL of your browser window, sandwiched between app.rightmessage.com/ and /dashboard. Copy those numbers to your clipboard.
Each account (or website) you have access to has a unique Account ID. So ensure that you’re looking at the dashboard for the right website before you proceed!
Once your Account ID is added and saved to the plugin’s settings, we’ll now include your unique tracking script in the <head> of every page on your website.
Superpowers our WordPress plugin gives you
Once you’ve installed our WordPress plugin, you’ll find additional options when setting up segment rules or defining a CTA Funnel.

These include:
- Current page
- Current post
- Current post’s tags
- Current post’s category
- Favorite tag
- Favorite category
These options allow you to segment or target based on whether someone’s reading a particular post or page, along with if the current post has a specific tag (or tags) or category.
Additionally, you can also segment someone based on their favorite tag or category.
How do we determine a favorite tag or category?
WordPress doesn’t include any concept of “favorite tag/category”, so it’s something we’ve built custom for our WordPress plugin.
When someone visits a post on your website, RightMessage tracks the category/tag(s) of that post. And we do the same for every post someone reads. This allows us to developer a leaderboard of content.
- Page view #1: Reads an article categorized under “Marketing”
Favorite category: Marketing
- Page view #2: Reads an article categorized under “Sales”
Favorite category: Sales
- Page view #3: Reads an article categorized under “Marketing”
Favorite category: Marketing
As someone consumes more content on your website, we continue to develop a profile around what kind of content they’re consuming the most of.
This can be used to personalized sitewide messaging and CTAs (i.e. if they’re reading a bunch of “marketing” articles and then visit the homepage, your hero headline can be about marketing.) We can also synchronize this data to your ESP/CRM, allowing you to send better targeted emails.
Setting a default end-of-post CTA
You can easily add a RightMessage embedded widget at the bottom of every post on your blog. This is a no-code way to quickly add a CTA that, ideally, complements other widgets (like exit popups or a slide-up toaster.)
To set this up, once you have a CTA Funnel with an embedded widget that you’d like to run sitewide, simply enter the value you’ve set in the “Where to display” input (i.e. “end-of-blog”).

Click the Save Changes button and you’re good to go.
Squarespace
RightMessage helps you personalize elements of your Squarespace website to convert the website traffic on your site into leads, sales, customers, and clients.
- About Us
- Contact Sales
- Contact Customer Support
- © RightMessage Inc. 2024
- Privacy Policy
- Terms of Service
