Best practices for testing
In this guide we’ve included a few best-practices around testing your website personalization campaigns and CTA Funnels.
Remember: we remember everything
When you’re testing RightMessage in your browser, we’re constantly tracking what the pages you’re visiting, the questions you’re answering, etc.
Many customers write in asking why, for example, they’re not seeing a question popup appear. Almost always, it’s because they’ve already answered the question in a previous page view.
The single best way to do ensure that you’re working with a clean slate is to view your website in incognito mode.
Testing personalization campaigns and CTA Funnels
Create “internal” auto-segment rules for testing
Segments can get applied in a lot of different ways: 1st/3rd party data, on-site behavior, or answers to questions.
Simulating putting people into segments – especially for tricky ones like they landed on /this-page from google.com – can be time consuming and brittle.
However, a specific auto-segment rule can make doing this really easy. Here’s how.
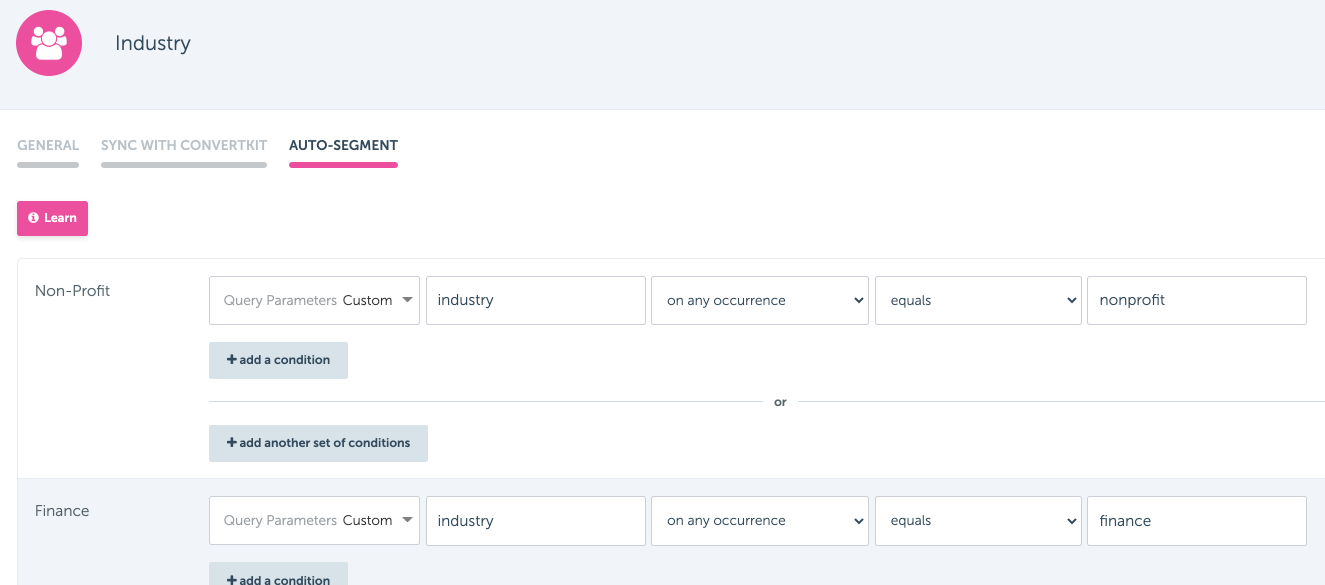
On the “Auto-Segment” tab for the Segment Group a particular campaign targets, add a new rule.
Choose “Query Parameters → Custom” and then enter something like “industry”, “on current page”, “equals”, and then a short name for the segment you’re currently modifying.

For example, say you have a “Non-Profit” segment within an “Industry” Segment Group. You’d create a rule that matches industry=nonprofit.
Do this for each segment you’re planning on testing.
Testing in the browser
Testing is easy once you have these auto-segment rules in place.
It’s usually best to start in incognito mode, and then layer on the relevant “internal” auto-segment query parameters that you need to accurately test both your personalization campaigns and CTA Funnels.
Let’s say you want to test the following segment combinations:
- Business is a non-profit
- Company size is 10-50 employees
- Using Xero for invoicing software
Based on the internal auto-segment rules you set up, accessing something like https://yoursite.com/?industry=nonprofit&size=10-50&tool=xero would have RightMessage place you in these three segments. And because your auto-segment rules are specified to be just for the current page, swapping out “nonprofit” with “retail” would then show a retail-focused variant of your home page.
Simulating a specific visitor on your website
You can also test the on-site experience of a particular subscriber or contact in your ESP/CRM.
To do this, the first step is to determine how we handle identifying visitors who exist as records in your email database. If you’re unsure, check out our Integrations section.
Once you know the custom query parameter we’re using for your chosen integration, all you need to do next is to find the unique ID for the contact you want to test. Hop on over to your ESP/CRM’s dashboard, find a subscriber, and copy their ID to your clipboard.
Now it’s as straightforward as firing up a new incognito window, heading to your website, and appending the query parameter and ID to the page URL. (Once you’ve done this, we’ll cache the contact ID and you can freely move around your website. Once you close the incognito browser, however, that cached data will be removed – which is probably for the best!)
For example, if you integrate with InfusionSoft and you want to impersonate Contact #12345, you’d load https://yoursite.com/?rm_isoft=12345.
Just remember that any segmentation activity – like questions you answer or segments that are added via auto-segmentation – will get synced up to the contact you’re testing. RightMessage can’t tell the difference between you testing a particular contact, and that contact actually arriving to your website via a marketing email.
Reporting
It’s not enough to just think that personalization is paying off. You need to know that the work you’re doing and money you’re spending on RightMessage is worth it. Our built-in reporting gives you detailed statistics on how y...
